Showing posts with label clothes. Show all posts

Tuesday, April 10, 2012

The Kids' Easter Outfits

Just a quick post to share the outfits I made for the kids to wear on Easter Sunday. I used Simplicity 2316, a skirt and jacket combo. Each of the girls got their own special little skirt and jacket, and I think they turned out so cute. Then I used the same jacket pattern to make a vest for Thomas. I just made it more angular in the front, instead of curved, and didn't add sleeves, and sewed on buttons instead of ribbons.

It was hard to get good pictures, the sun kept getting in the kids' eyes, leading to some funny facial expressions. But they were good sports about it.

I love Thomas' face in this one

Admiring our little cherry tree-to-be

Aahhh, so bright!
The kids were all pleased with their cute new clothes, and compliments abounded at church. It's so fun making clothes for the kids. :)

Wednesday, December 14, 2011

Christmas Goodies

I've been busy lately making stuff for the kids for Christmas. I'm not really big into commercialized Christmas; I prefer to give homemade gifts, and love to receive them as well. Of course we supplement our gift-giving with store bought things like books and a few toys, but I try to make as many Christmas gifts as I can.

I also love giving gifts that will actually be used. In our house, toys get played with briefly, then thrown on the floor in the bedrooms and tend to be forgotten about. That's why I try to keep toy-type gifts to a minimum and make/give lots of useful things that are also fun. This year I have spent the past couple of weeks making pajamas, aprons, and caps for the kids.

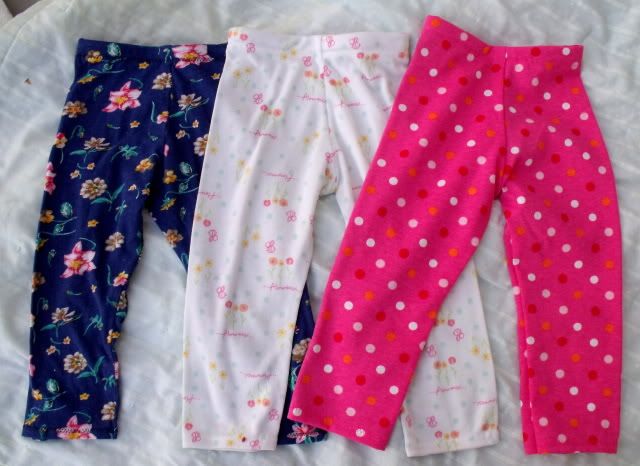
For the pajamas, each child chose a print of flannel for me to use, but they don't know what it's for. I made each a pair of flannel pants and a bought shirt with a personalized applique. I didn't use any patterns for the pants or appliques, I just traced around pants that fit loosely.

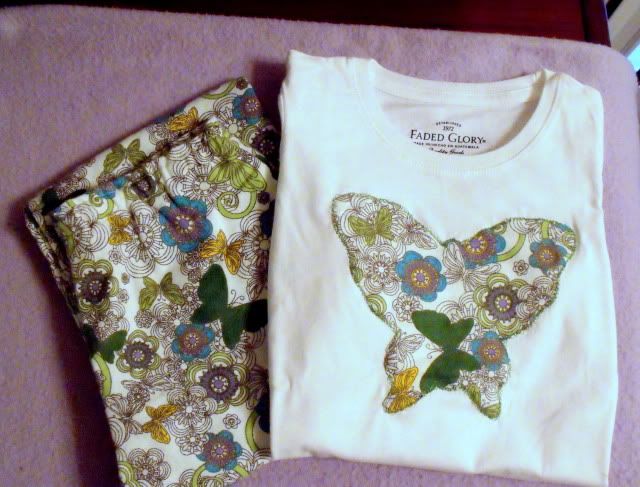
Zaylee's pajamas are covered with butterflies and flowers! I love this  butterfly print flannel that she chose, the colors are lovely and  butterflies are so fun.

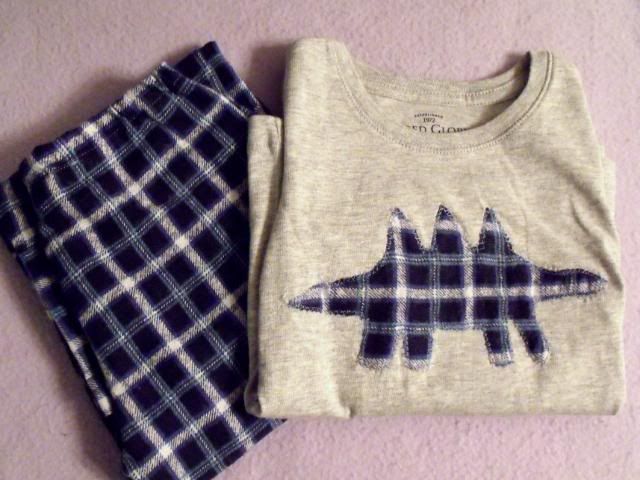
Thomas chose this manly blue flannel. You can't tell from the picture,  but the shirts I got were from the girls' section, and I didn't realize  until later that they have slight gathers on the shoulders that make  them look somewhat feminine. I knew I had to counteract that with a  boyish applique - enter the stegosaurus!

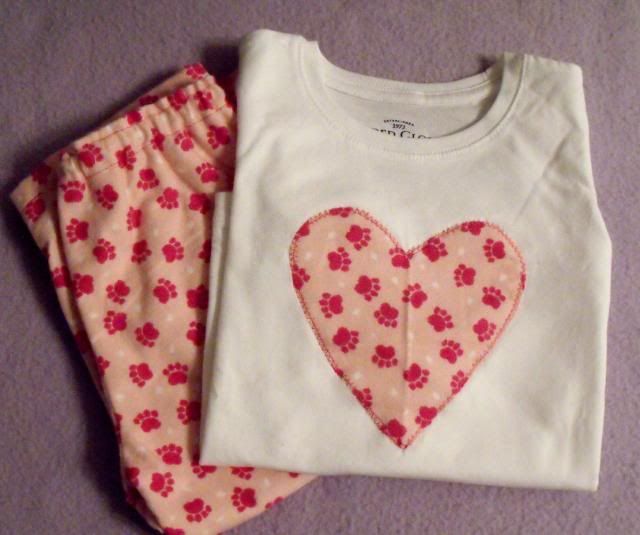
Zaylee chose this pink paw print fabric for Audrey, who was taking her  nap at the time. Since Audrey is a little sweetheart, her applique is a  heart.

All together, a pretty cute bunch.


My next project was to make each kid an apron. My kids love helping out in the kitchen, and every time they see me put on an apron, they run to the apron bin and grab an apron to wear. But they have to wear my aprons, which are too big for them. So I though they would enjoy each having their own apron, made just for them in their own size.

Again, I didn't use a pattern. I just traced out a basic apron shape in an appropriate size, hemmed all the edges, and added straps. They were very simple to make, and are sure to get lots of use. I also decided to make each one using fabric with a vintage-y feel, because I just really love that look.

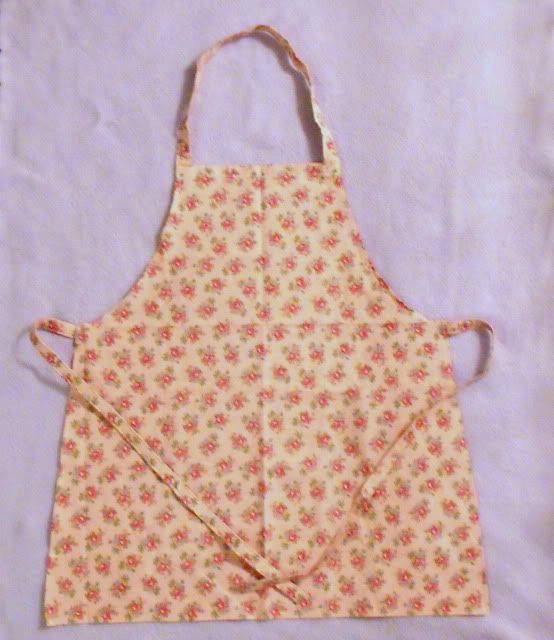
Zaylee, my girly girl, will love this pink apron with little flowers.

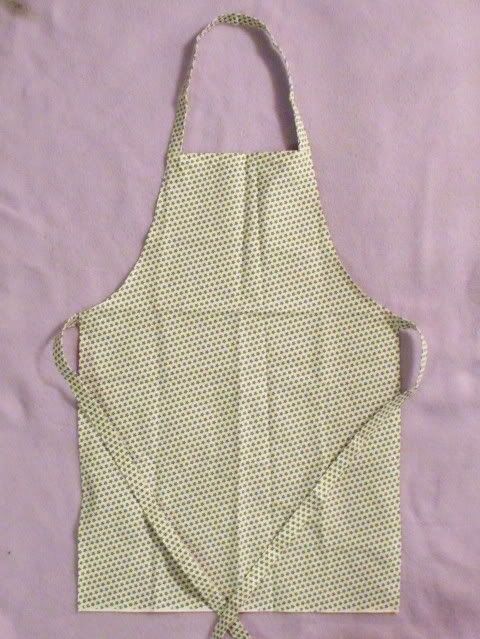
Thomas' apron has tiny green stars.

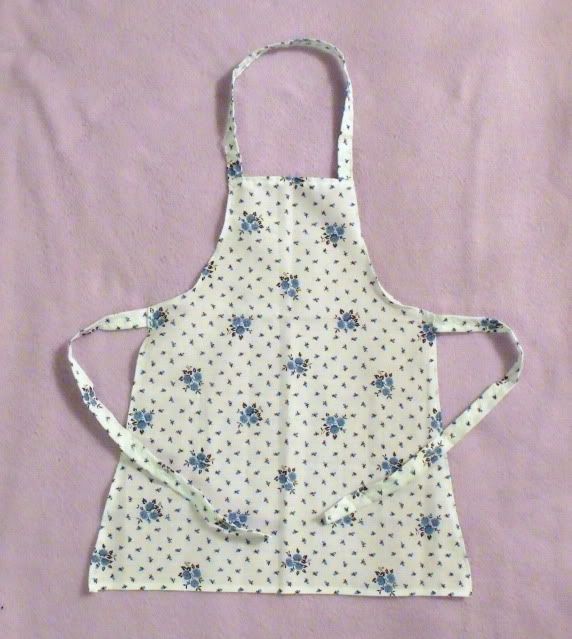
Audrey will look so sweet in the pale blue apron with pretty little flowers.

And finally, yesterday evening I used 
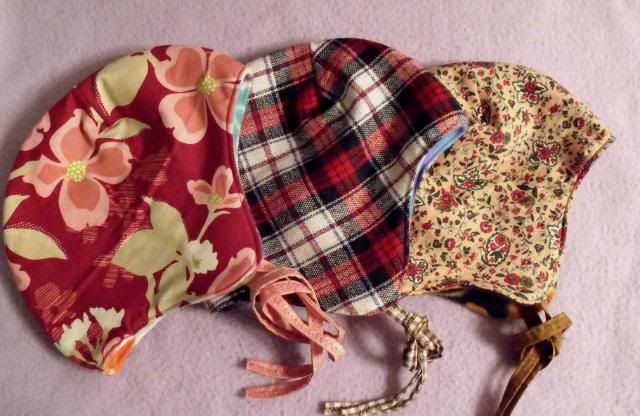
this super easy pattern to make each kid a warm cap to wear. It gets cold here in Utah, and the kids really need something to keep their heads and ears warm in the winter. The outside is simple cotton fabric, and the inside is fuzzy warm fleece. Ear flaps and chin tie straps complete these darling caps. Since the patten is sized for 10-16 months, I had to enlarge it three different times to make three different sizes of cap.


Zaylee's is dark pink with flowers. She really loves pink. And flowers.


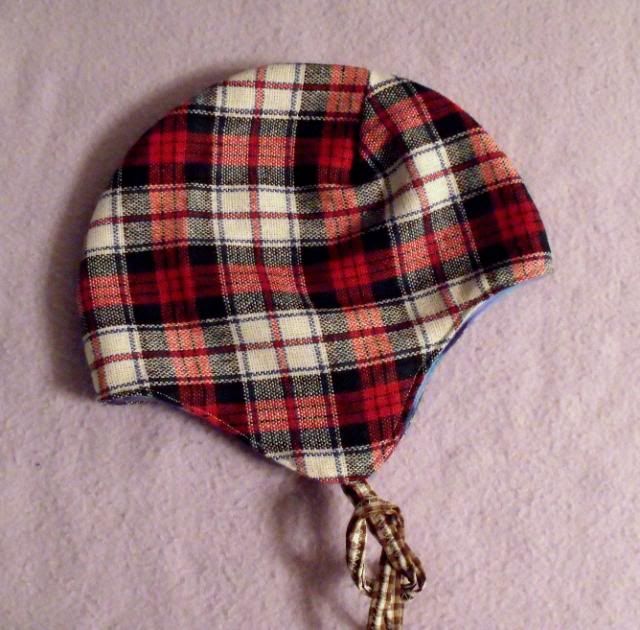
Thomas' hat is made with this red plaid. He'll look so cute as a manly little lumberjack!


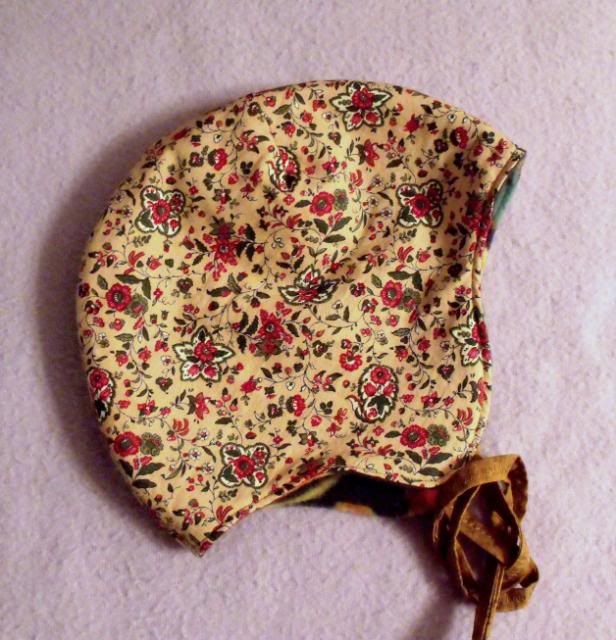
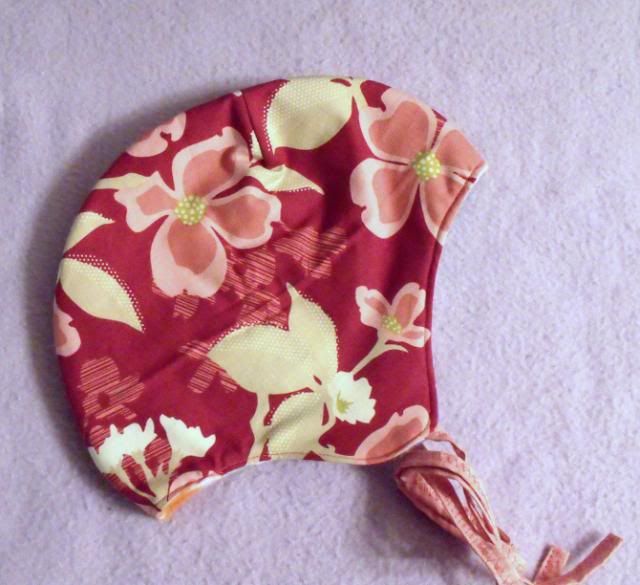
Audrey's hat is this classy brown fabric with flowers and paisley.


And here is Audrey modeling her little cap. I love that it's fitted so nicely and has chin straps - Audrey tends to not like wearing stuff on her head so it's nice that I can tie it on and she can't take it off! I also love that I can use her to model her own gifts, because for now she's still too young to know any better. :)

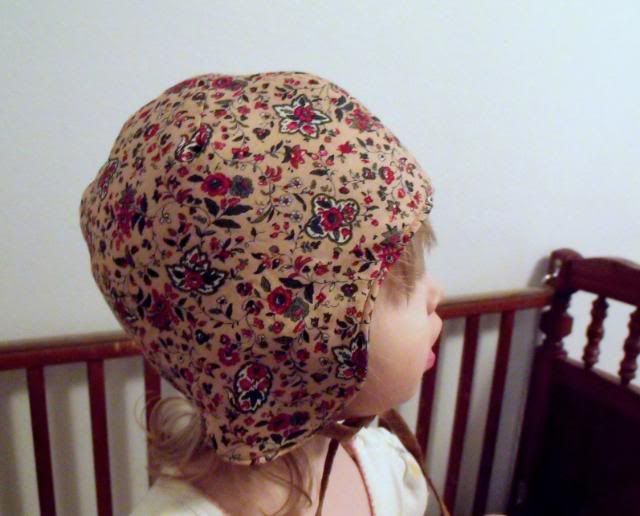
Look at those cute little curls peeking out! And those darling cheeks, I could just munch them up.

Makes me want to try to enlarge the pattern enough to make a cap for me - they look so cozy!

I'm sure there will be more homemade goodness to share before Christmas comes. I've got lots more ideas floating around!


A Crafty Soiree


Somewhat Simple

Tuesday, November 1, 2011

Halloween Costumes

Along with the cute little crocheted ears I made for the kids, I also had to make matching costumes. I'm all about doing things simple and inexpensive. We had a prowling kitty cat, and swooping bat, and a fluttering butterfly, and I was able to crank out all three costumes in three days.


The Cat

For Zaylee's cat costume, I crocheted a long, fuzzy tail and sewed it onto the back of some brown sweatpants. Besides the ears, the tail is her favorite part of her costume, and mine too! It's a long tube of double crochet, in Lion Brand Homespun.


Next I crocheted a large oval. This I hot-glued onto a brown turtleneck to act as the fuzzy belly. Add the ears and some kitty makeup, and the cat costume was complete.


The Bat

For Thomas' bat costume, wings were an absolute necessity. I used the basic instructions given at Alphamom (which I found on Pinterest, and can thus link this post to the pin-did challenge at The Modern Marigold, yay).


I did alter it a bit - I didn't use boning because they didn't have it at Wal-Mart when I did my quick costume supply shopping trip. Instead, I made the wings out of two layers of fabric, one of which was somewhat stiff, and that way the wings supported themselves and boning was unnecessary. Also, to attach the wings to the shirt, I cut out the side seams and resewed them with the wings, so now they're actually "built in" to the shirt. Again, I used a basic turtleneck and sweatpants as the base for the costume.


Ears and makeup, and my little bat was ready to fly.


The Butterfly

For Audrey's butterfly costume, all I had to do was add wings to a black turtleneck and pair it with black pants. And make an antenna headband that she wasn't too fond of wearing.


The wings are just two layers of fabric, with some interfacing to keep them stiff. I used a zigzag stitch to emphasize the shape of the wings. Then I sewed them onto the shirt. If I had it to do again, I would have just glued or pinned them on, because getting the shirt up onto the sewing machine enough to sew the top of the wings was really hard! And I would have used a bent clothes hanger or something to help the wings keep their shape - even with the interfacing they flopped forward too much and didn't really hold their shape well. But still, for a last minute project, it turned out okay.


Fun costumes!

Friday, October 21, 2011

Tiny Toddler Shrug

This started as an idea for a crocheted sweater dress for my toddler. But I realized partway through that it would be a little too long and a little too narrow to work as a dress. So I scrapped that idea. I turned the rectangle I had made on its side, sewed a couple little arm seams, and presto-chango, I had made a little shrug! I think it turned out so super cute.


I've even put together a pattern, my first crochet pattern. How awesome is that!

Tiny Toddler Shrug


Size: 24 month. Make a larger or smaller rectangle for other sizes.

Materials:
Small amount worsted weight yarn, colors A and B
Size I crochet hook

Special stitch:
5 dc cluster: (yo, insert hook into next st, yo, pull up a loop, yo, pull through first 2 loops) 5 times, yo, pull through all loops on hook.

With color A, ch 46.
Row 1: 2dc in 4th chain from hook (turning ch counts as first dc). *Sk 2 ch, sc in next ch, sk 2 ch, 5 dc in next ch.* Repeat to last 3 ch. Sk 2 ch, 3 dc in last ch. Drop color A. Do not turn.
Row 2: Join color B with sl st in top of turning ch at beginning of row 1. Ch 1, sc in same st, *ch 2, make 5dc cluster, ch 2, sc in 3rd dc of 5dc group.* Repeat to last 5dc group. Ch 2, sc in last dc of previous row, dropping color A and picking up color B. Turn.
Row 3: Ch 3 (counts as first dc), 2 dc in first st. *Sc in top of cluster, 5 dc in next sc.* Repeat to end, making 3 dc in last st. Drop color A. Do not turn.
Rows 4-38: Repeat rows 2 and 3.
Fasten off.

Make sleeves by folding the rectangle lengthwise, and sewing a seam 4 inches up each end, as shown. Turn right-side out, and put it on your little cutie!


Linking to friday fun finds at kojodesigns, and Feature Yourself Friday at Fingerprints on the Fridge.

Thursday, October 13, 2011

Three Days of KCWC and pin-did

This past week has been Kids Clothes Week, over at elsie marley! The challenge was to spend one hour every day working on clothes for the kids. I have been cheerfully participating - my kids have really been in need of some new clothes to carry them into the cool fall season. I'm posting the work of three days in one post, because I bought a new camera (imagine a huge choir singing "hallelujah!") but it didn't get here until today (Thursday) so I couldn't take pictures. My old camera has finally finished biting the dust. I couldn't even see any picture I took with it until I uploaded it onto the computer. And forget about adjusting for focus, lighting, etc. Hooray for my new Fuji S1500. :)

Also, every item I've worked on so far this week has been something that I have pinned on Pinterest. So this also counts toward the Pin-Did challenge at The Modern Marigold. This challenge is to once a week actually do something that you have pinned on Pinterest. What a novel idea!

Monday:

Audrey needed new leggings. She has so many cute little dresses, and with the weather getting cooler (we can see snow on the mountains!) leggings are the perfect thing to keep those cute little legs warm. I used the tutorial from make it & love it (pinned here) to make some super simple leggings. It's such a simple pattern that I was able to make four pairs in part of an evening. Now those little legs will stay warm when Audrey is dressed up for church. Or wherever. :)


Tuesday:

I headed in a different direction on Tuesday - crochet. Using this pattern from Christina's Crochet Haven (pinned here), I made a darling sweater coat for Zaylee. She loves wearing sweaters, and this one just looked so cute and fun. I didn't have enough of any one colorway to do the whole sweater, so I ended up using three different skeins - one for the top of the bodice, one for the bottom of the bodice, and one for the sleeves. I actually really like the way it turned out. Besides, color blocking is a pretty trendy look right now, so I can probably get away with telling people I did it on purpose.


Just a quick note: I love working with Lion Brand Homespun. It's so soft and chunky, and very comfortable. And the mild color gradations are just so fun and so pretty. Plus the texture is great for hiding little mistakes (nothing too major, just wonky tension and stuff like that). I always keep an eye out for it at thrift stores, because I'm too cheap to buy it retail. But when I do find it, it's like I've found a pirate's treasure, that's how excited I get. I just really like this yarn.

Wednesday:

Thomas' turn to get in on the KCWC action. I recently got my little guy a few new dress shirts for church. Naturally this led to the desire to make new ties to go with his new shirts. I loosely followed the tutorial to make a skinny tie from see kate sew (pinned here). I didn't follow the pattern/tutorial exactly, because I wanted the ties to be a little bigger. I went ahead and made several ties, assembly line style, so we can have a variety to choose from each week. I love dressing up my kids, it's so fun.


Also linking to:
Feelin' Feminine Friday at The American Homemaker
friday fun finds at kojodesigns