Sunday, November 24, 2013

Making a Kitchen, Part 8 - Prettying Up the Cabinets

I keep telling myself I'll add another post as soon as I fully finish another kitchen project. But even though I'm still hard at work, none of my projects ever seem to be completely finished! I guess that's just how it goes with diy remodels.

So even though my cabinets still aren't completely done, I'm still going to post about them. Because my readers, few though they may be, deserve to see my lovely cabinets in all their almost-finished glory!

The last time I posted, my cabinets looked like this:


And like this:


And now they look like this!


And like this:


I have fronts on all the drawers, and doors on most of the cabinets. I still need to make six upper cabinet doors, but since it is getting cold here in Utah, and I don't have a garage in which to work, there is a very distinct possibility that we will be living with door-less cabinets until spring rolls around. Kind of annoying, but if it's too cold to cut wood, I'm not going out and cutting wood. So there. :)

Here's one of our door-less cabinets, right next to the corner cabinet. I am particularly proud of this corner cabinet, and really like how the hinged doors turned out.


I originally bought some fancy corner pie cut hinges for the door that would be hidden, and would need holes drilled partially through the back of the door in order to install them. Eventually I chose to do these hinges instead. I like the look better, and they were much easier to install than the fancy hinges would have been.

All the hardware (hinges, knobs, drawer pulls) is oil-rubbed bronze. The paint is Valspar's Courtyard Tan in flat. I made it into chalk paint by adding a couple tablespoons of unsanded grout per cup of paint. The upper cabinets are finished using Minwax paste wax, and the lower cabinets are finished with polyurethane (I got lazy and didn't feel like waxing and buffing anymore!).

Here's a close-up of the door knobs:


And the drawer pulls:


Pretty, aren't they?

As for the doors themselves, I used two different styles of doors for the upper and lower cabinets. The upper doors are just 3/4" boards cut to size, and have mitered molding nailed to the front for decoration. I used this video by Bob Vila as inspiration for the doors. The lower doors are frame and panel doors made using these plans by Ana White.


The doors are hung with a 3/8" overlay on all sides. And let me tell you, hanging cabinet doors is no easy task! Especially when they were built by an amateur such as myself, and may not have been built perfectly square... But we did the best we could, and we just tell ourselves that all the little imperfections add character.

Stay tuned to see our floors. I just finished them, and they are super awesome!

In case you missed it:
Part 2: A Day in the Life
Part 3: What Next? 
Part 4: "Before" Pictures
Part 5: Demolition and Prep Work
Part 6: Cabinet Installation 
Part 7: Counters 

Linking:


The Patriotic Pam


Thursday, October 17, 2013

Making a Kitchen, Part 7 - Counters

I just want to say that I love my new counters! Absolutely love them. And after going so long without counters, it has been wonderful just to have counters - to set things down on, to make the kids' lunches on, to look at and admire and stroke just because they're so pretty...


I used this tutorial from Breakfast For Dinner to make these gorgeous counters out of solid wood. Before Pinterest, I never would have considered making my own counters. It just never would have occurred to me. But when I realized that I didn't have to choose between cheap laminated particleboard and pricey granite or marble, and could instead make my own beautiful (and budget-friendly!) counters, the decision was easy.

The counters were fairly simple to install. It would have been easier if the cabinets I built were more square and level. Unfortunately I am an amateur at woodworking, and my cabinets are definitely imperfect. I adjusted as well as I could by using shims under the counters


I did run into a little trouble when it came to staining the wood filler. I used stainable wood filler for the seams between the boards and sanded it nice and smooth.


But when I stained the counters, the wood filler took the stain much differently than the wood itself. It turned out much rougher and grayer than the wood, and wasn't very attractive.


My sister suggested that I use a wood graining tool to camouflage the seams. So I bought this funny-looking rubber thing and a container of glaze, looked up a couple tutorials on youtube, and got to work. It still isn't perfect, but the seams blend in much better.

Bad picture quality - my pictures turn out so much better during the daytime!

There, that's better!

After sealing the counter tops with several coats of polyurethane, I have to say I am so pleased with my counters! They are thick and sturdy, and a joy to look at.


Here's what the counters look like with the backsplash I'm installing. More on that later...


Details: Counters are kiln-dried Douglas fir, using two 2x10s and one 2x8. Stain is Minwax oil-based wood finish in Provincial 211.

In case you missed it:
Part 2: A Day in the Life
Part 3: What Next? 
Part 4: "Before" Pictures
Part 5: Demolition and Prep Work
Part 6: Cabinet Installation 

Linking to:
Think Tank Thursday
Link Party Palooza
Project Inspire{d} 

Friday, September 27, 2013

Making a Kitchen, Part 6 - Cabinet Installation

Do you ever find yourself in the middle of a project and feel like you've run out of steam? That's sort of where I am with this kitchen. The only problem is that I can't just set it aside for later, like I could if I were working on a simple craft. The longer this kitchen renovation lasts, the longer we have to survive living without a kitchen. So I have to just keep plugging away, checking things off the list one at a time. And keep reminding myself why I took on this huge project, and how great it will be when it's finished!

The latest item checked off the big to-do list was installing the cabinets. It took us a long time to do this. During Jeff's work week, we were only able to install one or two cabinets each night before he had to go to bed. Once his work week was over though, we knocked out the rest of the cabinet installation in a couple of days.

The first cabinet was the hardest to figure out. I nailed up a ledger, or guide board, to help hold up the cabinet while we attached it to the wall. Later I realized that using screws was much better! The nailed-up ledger kept pulling out of the wall. Anyway, we put the cabinet up to the wall and attached it to one stud, then realized that there wasn't another to use. So we had to take out the screws and pull the cabinet back down. I went to put a toggle bolt in the wall only to realize that without marking it on the cabinet and the wall, I wouldn't be able to line up the screw. So up went the cabinet again, this time so I could drill a pilot hole through the cabinet and the wall. Put the cabinet back down, and install the drywall toggle bolt. Then back up went the cabinet, for the final time. I screwed it into the stud and the toggle bolt while Jeff held it up, and it was finally installed!


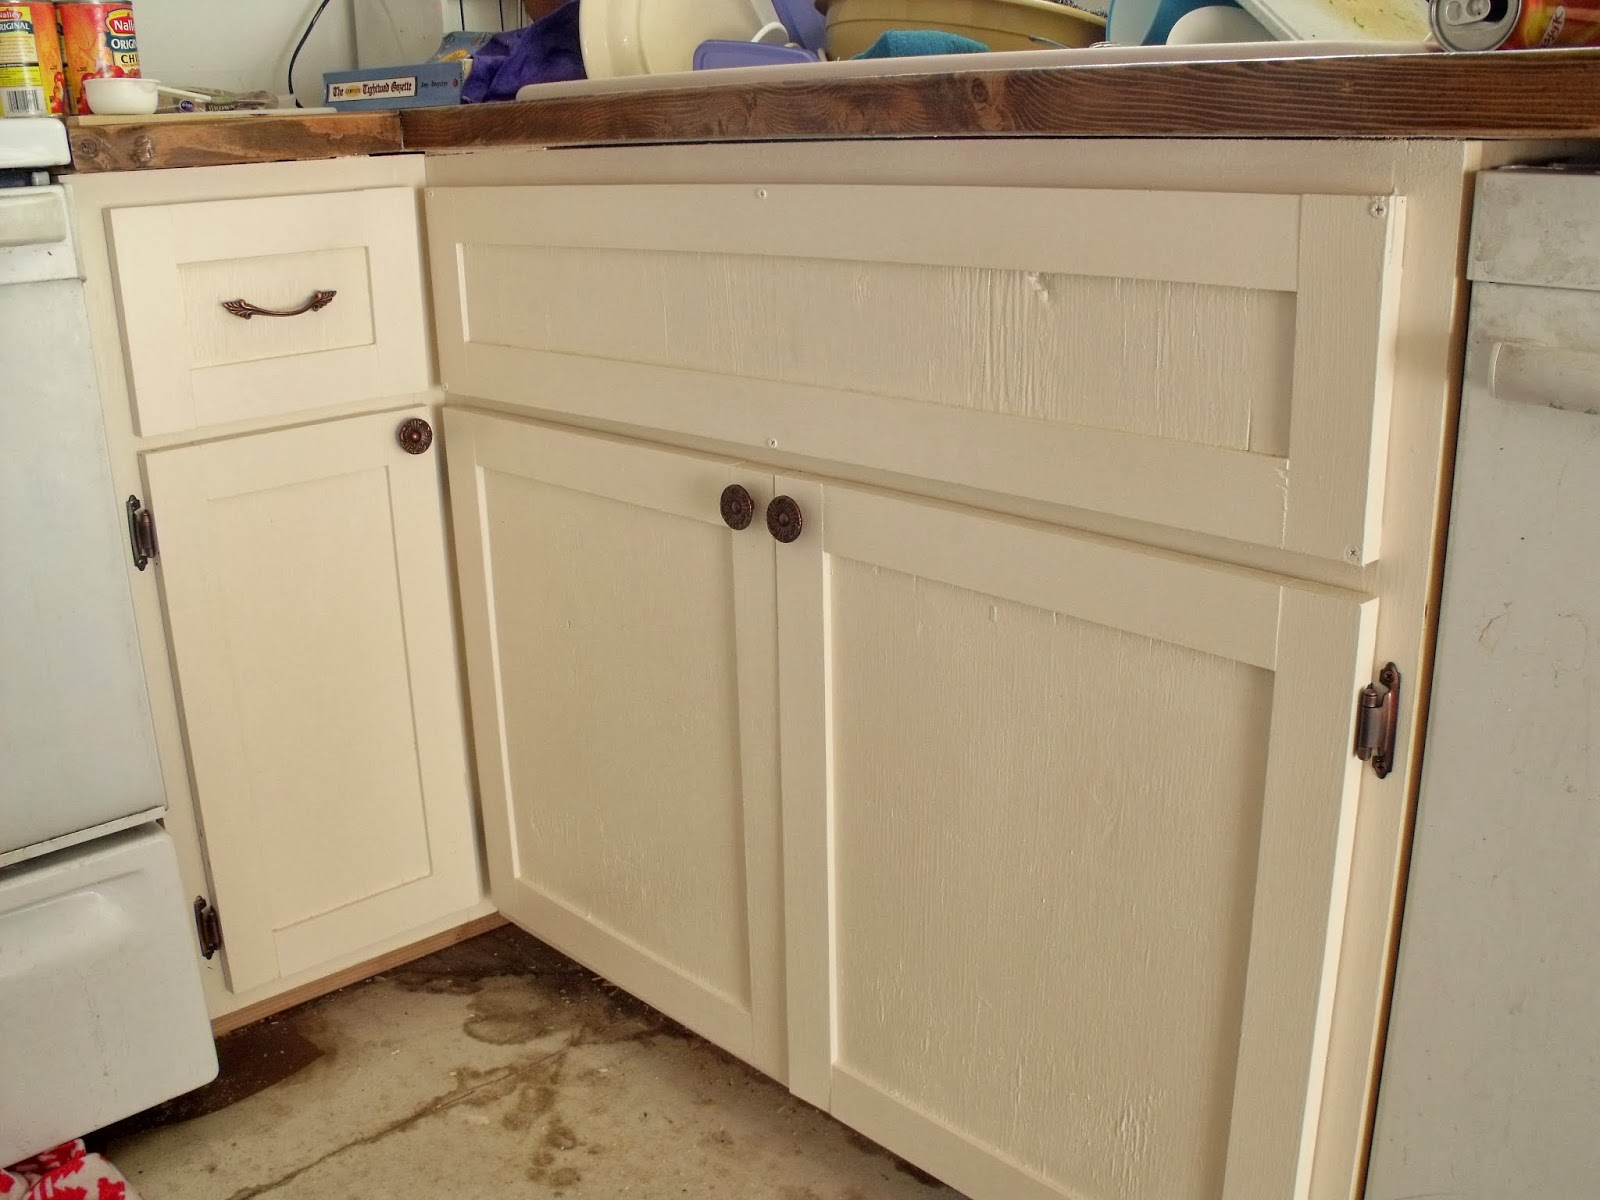
After Jeff went to bed, I went ahead and installed the base cabinet directly below this one. During this process, I learned all about how to use shims. I also learned that our walls are not at all square! I ended up filling the gap between the cabinet and the wall with shims and wood filler.


The next day we installed the pie cut corner wall cabinet. It was very large and bulky, not to mention heavy! Thankfully there were at least two studs we could attach it to, so no up-and-down like the first cabinet.


After this, we just kept adding cabinets whenever we could for the duration of Jeff's work week. About this time, I also decided to install a small crown molding along the tops of the cabinets. This decision was directly based on the fact that I am not a professional cabinet builder and the cabinets I built were not completely square. The molding helped to camouflage areas where the cabinets didn't line up perfectly. I used PVC shingle molding because it was inexpensive and fairly easy to work with. One cabinet at a time, our kitchen began to take shape!

Corner unit, before I started adding molding

The first cabinet, with molding attached

The corner unit, with molding attached

All cabinets installed along the oven range wall. Man, you can really see a difference in picture quality between pictures I took during the day and those taken at night.

The cabinet on the right is shorter because I didn't want to have to move the phone jack. We tried to do as little with electric and plumbing as possible, so the oven, the sink, and the phone stayed where they were originally, and I designed the cabinetry around them. I do want to put floating shelves or something fun and pretty in that area though.

This one was a complicated beast to install! I had to make several cuts to allow for the pipes, the water lines to and from the dishwasher, and the a/c vent and duct work under the cabinet. I was so excited to have this cabinet finally installed!

All cabinets installed along the sink wall. We did these all in one day, since it was no longer work week for Jeff. His schedule dictates so much of our lives, and especially this remodel.

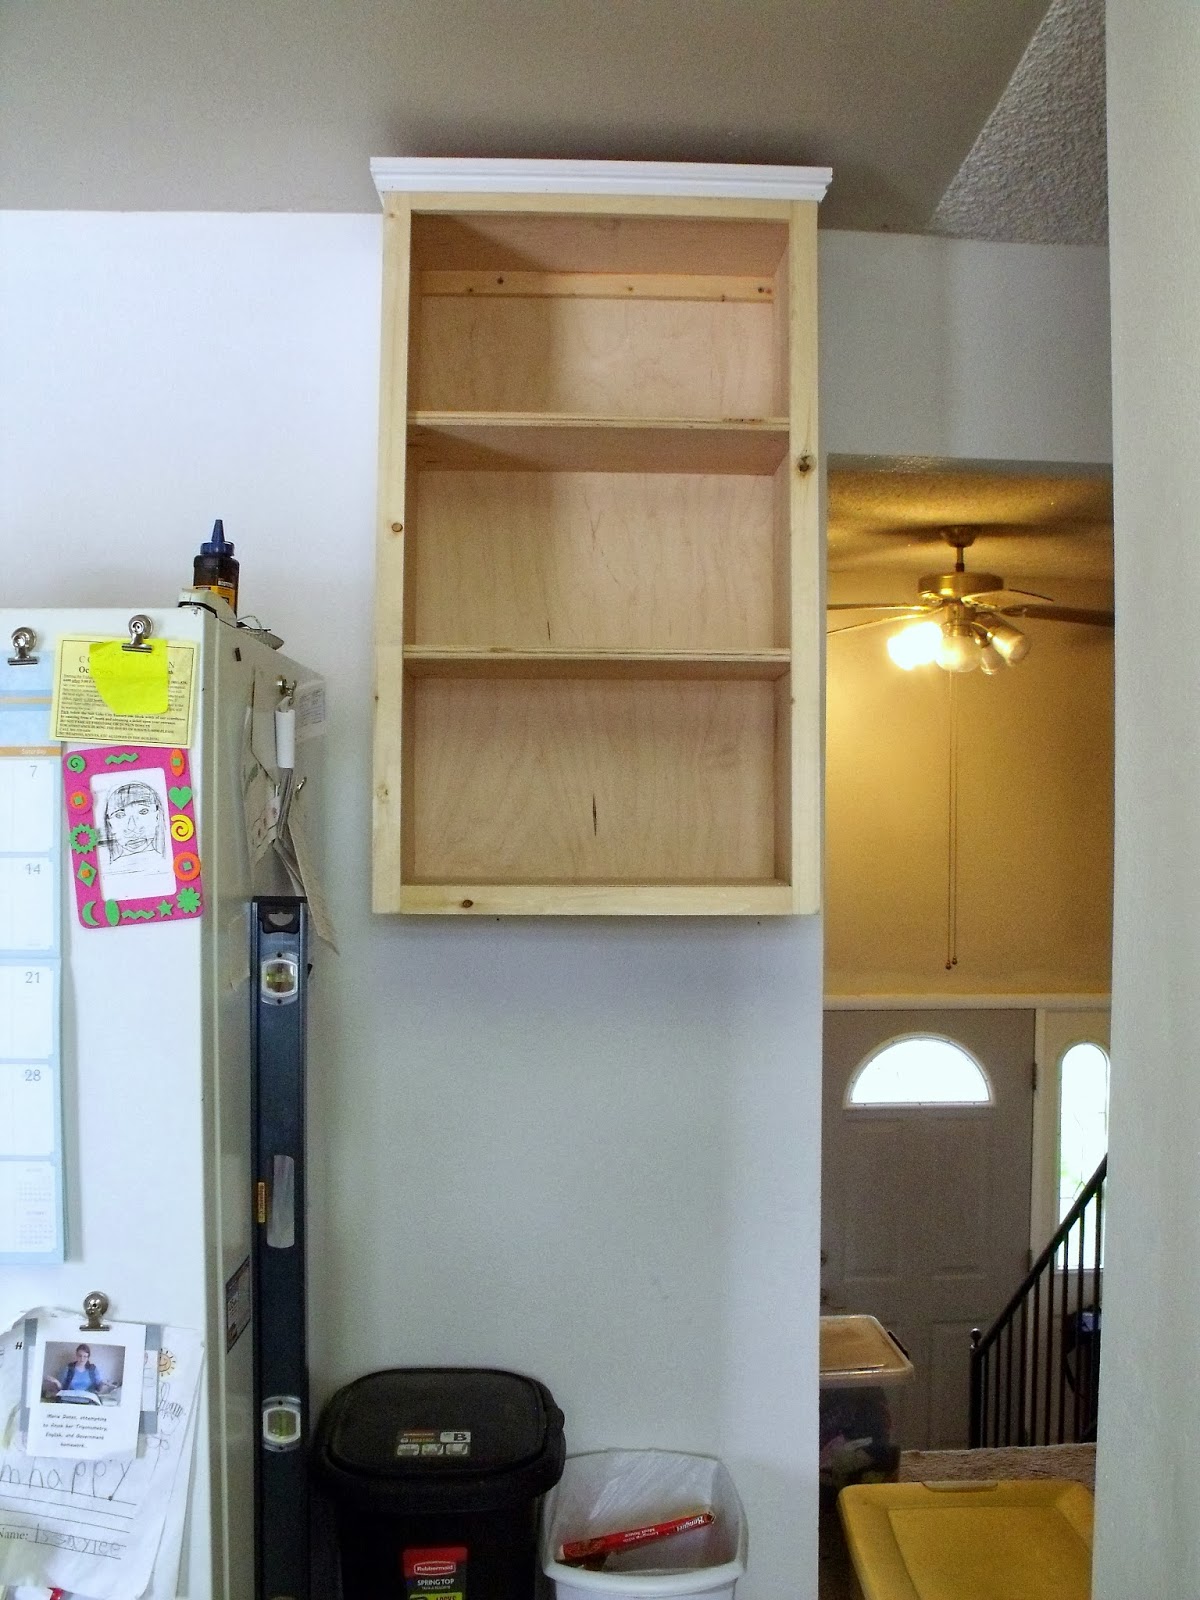
The little cabinet nook next to the fridge. Originally there were no cabinets here at all. We had a bookcase here with cookbooks and random stuff. I'm so excited to have this area, it will hold the stand mixer, the blender, the cookbooks, and lots of baking supplies.

It also houses the microwave. I'm not sure yet what to do with that cord hanging down, but it will be nice not to have to give up counter space for the microwave.

Yesterday we installed the very last cabinet.

It took just over a week to install all the cabinetry. I don't have all the molding up yet, it wasn't until the very last cabinet that it occurred to me to attach the molding before putting the cabinet on the wall. So on a couple cabinets, I just can't reach it. Once the counters are installed I'll be able to stand on them and attach the rest of the molding. But for now, I'm just really glad to have all the cabinets installed.

Expect more posts later on installing the hardwood counters, painting the cabinets, building the cabinet doors and drawer fronts, and doing the paper bag floor!

In case you missed it:
Part 2: A Day in the Life
Part 3: What Next? 
Part 4: "Before" Pictures
Part 5: Demolition and Prep Work

Linking to:
Link Party Palooza at tatertots & jello  
Project Inspire{d} at Dukes & Duchesses
Think Tank Thursday at Joyful Homemaking

Saturday, September 21, 2013

Making a Kitchen, Part 5 - Demolition and Prep Work

This post will be a compilation of all my Facebook status updates and pictures dealing with the kitchen renovation from September 11 through September 18. During this period we completely took apart our nasty old kitchen and did a great deal of preparation for the new kitchen. Enjoy!

September 11

1:04 pm - Jeff and I are taking advantage of his week off. Right now we're clearing out the kitchen! Once it's empty enough, I'll take all the "before" pictures and we'll be ready to start demolition. Actually, we'll be taking stuff apart carefully to avoid a huge mess, so Jeff says we should call it "dismantling" the kitchen. Anyway, I'm so excited to finally get started!

September 12

12:30 pm - I've been hard at work all morning, and am now taking some break time for lunch and facebooking. :) I finished clearing everything out of the kitchen, did a bit of cleaning up, and took my before pictures. I'll do a blog post of that later tonight. As of now, all the drawers and cabinet doors have been removed, and we already took down two wall cabinets.

3:49 pm - Does anyone in the Salt Lake-ish area know how to remove a kitchen sink and unhook all the plumbing, and would be willing to walk Jeff and I through it?

10:12 pm - It only took a mere 6 hours, 5 youtube videos, 1 trip to the hardware store, and countless cries of "What the heck!" "This is ridiculous!" "Ouch!" and "That is disgusting!"


10:25 pm - Well, here's how our kitchen looks at the end of Demo Day 1. What a mess! Tomorrow I need to clear some space in the living room so we can put the fridge and oven in there while we work some more in the kitchen.


September 13

1:08 pm - Bye bye counters!


1:09 pm - Really wishing we had been able to get all this done before neighborhood clean-up. Disposing of all this would have been a bit simpler.


2:43 pm - Shudder shudder! A long dead mouse under the bottom of the sink cabinet is the last thing I wanted to see today! Yuck!

4:03 pm - All the cabinets are out! I am sweaty and stinky (oh, so very stinky), but filled with a sense of accomplishment. Also a sense of disgust at all the mouse poo and other gunk we've been sweeping up, but mostly accomplishment.


6:03 pm - All the linoleum and the particleboard underlayment have been removed. My back and legs are aching from all the bending over to pull out staples from the floor, and I'm starting to get a migraine from all this work. But we're really seeing a lot of progress! I think I'm pretty much done for the day.


11:28 pm - A shower is nice. A shower after a long day of hard work is amazing.

September 14

11:36 am - It's funny how kids react to something when you move it. Chairs? Something to sit on at dinner time. Chairs moved into the living room? A playtime paradise!

2:31 pm - Nasty dining room carpet is out! I had to pry all the carpet tacks out of the floor, remove the foam underlayment, roll the carpet out of the way, and pull out all the staples. All this without removing the table from the dining room - there was just no place to put it.


8:29 pm - Every once in a while in this whole kitchen remodeling whirlwind, I should at least try to remember to make time to do the normal everyday things. Like catching up on laundry - if I don't do some tonight, we'll all be wearing dirty clothes to church tomorrow!

September 16

10:38 am - First coat of paint is up! I mentioned to Jeff this morning that a big benefit of our chosen kitchen style is that any imperfections can be chalked up to the inherent rusticity of farmhouse decorating. :)


6:49 pm - Oh dilemmas. Somehow I have to be able to move the oven, fridge, and dishwasher out of the kitchen eventually, or I won't be able to do the flooring. But we can't figure out how to unhook the water line from the fridge or the dishwasher. It's really frustrating knowing that you absolutely need to do something and can't see a way around it, but have no idea how to do it.

September 17

9:31 am - Well, Jeff's week off is over, and he's back to work. Which means that the kitchen renovation will be going much more slowly for the next several days. Ugh, I just wish it were over and we had a gorgeous new kitchen already!

5:46 pm - Figured it out! When it's time to do the flooring, I'll just put the flooring everywhere except under the fridge and dishwasher. Then, once it's all done drying and curing and everything, I'll pull out the dishwasher and fridge and do the flooring under them. So there.
(One of the comments on this status was to do this in reverse - do the flooring where the fridge and dishwasher will be first, then put them in place and do the rest of the flooring. This is what I eventually decided on, to avoid scratching up the main part of the floor.)

September 18

12:06 pm - Today I've just been working on little things around the kitchen. I marked the studs with chalk line, replaced some outlet covers, and attached bead board to a couple end cabinets. Still have lots of bead board to attach, which I'll do once I get around to cutting it.

5:39 pm - Bead board on the cabinets is almost all done, I just have three more panels to attach. This is going to be so pretty!


Well, that's it! Just over a week of hard work, sweat, tears, and hollering at the kids to not walk on the kitchen floor in bare feet, and the demolition and prep work were completed. Stay tuned for the process of putting everything back together again. :)

In case you missed it:
Part 2: A Day in the Life
Part 3: What Next? 
Part 4: "Before" Pictures

Linking to:
Link Party Palooza at tatertots & jello
Project Inspire{d} at Dukes & Duchesses  
Think Tank Thursday at Joyful Homemaking

Thursday, September 12, 2013

Making a Kitchen, Part 4 - "Before" Pictures

In case you missed it:
Making a Kitchen, Part 2: A Day in the Life
Making a Kitchen, Part 3: What Next? 

Any good renovation starts with some really yucky "before" pictures. This is where you get to show the world exactly why you chose to renovate in the first place. And that is what this Making a Kitchen installment is all about.

Brace yourself, kitchen ugliness ahead!

First glance, maybe not too bad. Just a bit bland.


Very, very bland. Nondescript bluish grayish blah-ish cabinets, plain counters. Not much going on.


White-ish walls, icky linoleum flooring. The fridge stuck against a big, empty wall.


Not much going on here. Oh, you know, just a big hole in the wall that's been there for about a year.


We removed the dated wallpaper before we moved in, nearly four years ago. And the walls have looked like this every since.


We removed all the outlet covers too, because we were planning on painting the walls. We never did, and the covers never got put back on. Again, we've been living like this for almost four years.


The linoleum floor is stained, buckled, warped, and all around nasty to look at and to walk on.


This is the cabinet under the sink. Disgusting!


Some of the cabinet doors and drawers don't even close properly.


The laminate counter tops have seen better days.


Yup, definitely a little worse for wear.


The seams between the sheets of laminate are pulling apart and stained black.


And there's this random corkboard stuck to the side of one cabinet. I thought it might be handy, so I left it up when we moved in. But it's in an inconvenient spot, and we haven't really used it in, you guessed it, nearly four years.

And there you have it. This is what I have been living with ever since we moved in. I am so ready for a change!

Since taking these pictures, we have already begun to take down cabinets. Thanks for bearing with me through all these nasty "before" pictures. Stay tuned for all the fun, messy "during" pictures!

Linking to: Link Party Palooza at tatertots & jello