Wednesday, December 14, 2011

Christmas Goodies

I've been busy lately making stuff for the kids for Christmas. I'm not really big into commercialized Christmas; I prefer to give homemade gifts, and love to receive them as well. Of course we supplement our gift-giving with store bought things like books and a few toys, but I try to make as many Christmas gifts as I can.

I also love giving gifts that will actually be used. In our house, toys get played with briefly, then thrown on the floor in the bedrooms and tend to be forgotten about. That's why I try to keep toy-type gifts to a minimum and make/give lots of useful things that are also fun. This year I have spent the past couple of weeks making pajamas, aprons, and caps for the kids.

For the pajamas, each child chose a print of flannel for me to use, but they don't know what it's for. I made each a pair of flannel pants and a bought shirt with a personalized applique. I didn't use any patterns for the pants or appliques, I just traced around pants that fit loosely.

Zaylee's pajamas are covered with butterflies and flowers! I love this  butterfly print flannel that she chose, the colors are lovely and  butterflies are so fun.

Thomas chose this manly blue flannel. You can't tell from the picture,  but the shirts I got were from the girls' section, and I didn't realize  until later that they have slight gathers on the shoulders that make  them look somewhat feminine. I knew I had to counteract that with a  boyish applique - enter the stegosaurus!

Zaylee chose this pink paw print fabric for Audrey, who was taking her  nap at the time. Since Audrey is a little sweetheart, her applique is a  heart.

All together, a pretty cute bunch.


My next project was to make each kid an apron. My kids love helping out in the kitchen, and every time they see me put on an apron, they run to the apron bin and grab an apron to wear. But they have to wear my aprons, which are too big for them. So I though they would enjoy each having their own apron, made just for them in their own size.

Again, I didn't use a pattern. I just traced out a basic apron shape in an appropriate size, hemmed all the edges, and added straps. They were very simple to make, and are sure to get lots of use. I also decided to make each one using fabric with a vintage-y feel, because I just really love that look.

Zaylee, my girly girl, will love this pink apron with little flowers.

Thomas' apron has tiny green stars.

Audrey will look so sweet in the pale blue apron with pretty little flowers.

And finally, yesterday evening I used this super easy pattern to make each kid a warm cap to wear. It gets cold here in Utah, and the kids really need something to keep their heads and ears warm in the winter. The outside is simple cotton fabric, and the inside is fuzzy warm fleece. Ear flaps and chin tie straps complete these darling caps. Since the patten is sized for 10-16 months, I had to enlarge it three different times to make three different sizes of cap.


Zaylee's is dark pink with flowers. She really loves pink. And flowers.


Thomas' hat is made with this red plaid. He'll look so cute as a manly little lumberjack!


Audrey's hat is this classy brown fabric with flowers and paisley.


And here is Audrey modeling her little cap. I love that it's fitted so nicely and has chin straps - Audrey tends to not like wearing stuff on her head so it's nice that I can tie it on and she can't take it off! I also love that I can use her to model her own gifts, because for now she's still too young to know any better. :)

Look at those cute little curls peeking out! And those darling cheeks, I could just munch them up.

Makes me want to try to enlarge the pattern enough to make a cap for me - they look so cozy!

I'm sure there will be more homemade goodness to share before Christmas comes. I've got lots more ideas floating around!


A Crafty Soiree


Somewhat Simple

Wednesday, November 9, 2011

Wire Wrapped Ring

I have a confession. I weigh about 30 pounds more than I did when Jeff and I got married (insert grumpy, pouty, embarrassed facial expression here). One of the many downsides of this is that my wedding ring just doesn't fit anymore. Quite annoying, since I really love my wedding ring.

So I decided that I need something I can wear at this larger size, at least until I put forth the effort to lose the weight. Trust me, making a pretty ring is much easier than losing 30 pounds! Especially if it's this ring.


I used this very simple tutorial I found on pinterest. I did have to buy some equipment for this - specifically a ring mandrel and some craft/beading wire. The mandrel I purchased on etsy (here) and the wire came from the beads/jewelry section at Wal-Mart.


After seeing my lovely new ring, the kids were super eager to have me make one for each of them as well. So here's one I made for Zaylee:


And one I made for Thomas (I used a miniaturized version of this tutorial instead, no beads. Tried to get it a little less feminine):


I can see myself getting hooked on making these simple rings. So quick, so elegant, so fun!


A Crafty Soiree
Somewhat Simple

Tuesday, November 1, 2011

Halloween Costumes

Along with the cute little crocheted ears I made for the kids, I also had to make matching costumes. I'm all about doing things simple and inexpensive. We had a prowling kitty cat, and swooping bat, and a fluttering butterfly, and I was able to crank out all three costumes in three days.


The Cat

For Zaylee's cat costume, I crocheted a long, fuzzy tail and sewed it onto the back of some brown sweatpants. Besides the ears, the tail is her favorite part of her costume, and mine too! It's a long tube of double crochet, in Lion Brand Homespun.


Next I crocheted a large oval. This I hot-glued onto a brown turtleneck to act as the fuzzy belly. Add the ears and some kitty makeup, and the cat costume was complete.


The Bat

For Thomas' bat costume, wings were an absolute necessity. I used the basic instructions given at Alphamom (which I found on Pinterest, and can thus link this post to the pin-did challenge at The Modern Marigold, yay).


I did alter it a bit - I didn't use boning because they didn't have it at Wal-Mart when I did my quick costume supply shopping trip. Instead, I made the wings out of two layers of fabric, one of which was somewhat stiff, and that way the wings supported themselves and boning was unnecessary. Also, to attach the wings to the shirt, I cut out the side seams and resewed them with the wings, so now they're actually "built in" to the shirt. Again, I used a basic turtleneck and sweatpants as the base for the costume.


Ears and makeup, and my little bat was ready to fly.


The Butterfly

For Audrey's butterfly costume, all I had to do was add wings to a black turtleneck and pair it with black pants. And make an antenna headband that she wasn't too fond of wearing.


The wings are just two layers of fabric, with some interfacing to keep them stiff. I used a zigzag stitch to emphasize the shape of the wings. Then I sewed them onto the shirt. If I had it to do again, I would have just glued or pinned them on, because getting the shirt up onto the sewing machine enough to sew the top of the wings was really hard! And I would have used a bent clothes hanger or something to help the wings keep their shape - even with the interfacing they flopped forward too much and didn't really hold their shape well. But still, for a last minute project, it turned out okay.


Fun costumes!

Friday, October 28, 2011

Crochet Critter Ears

My kids want to be animals for Halloween this year. Thomas has been insisting on being a bat for weeks. Zaylee recently decided she wanted to be a cat.

Bats and cats have ears.

Hence, this post.


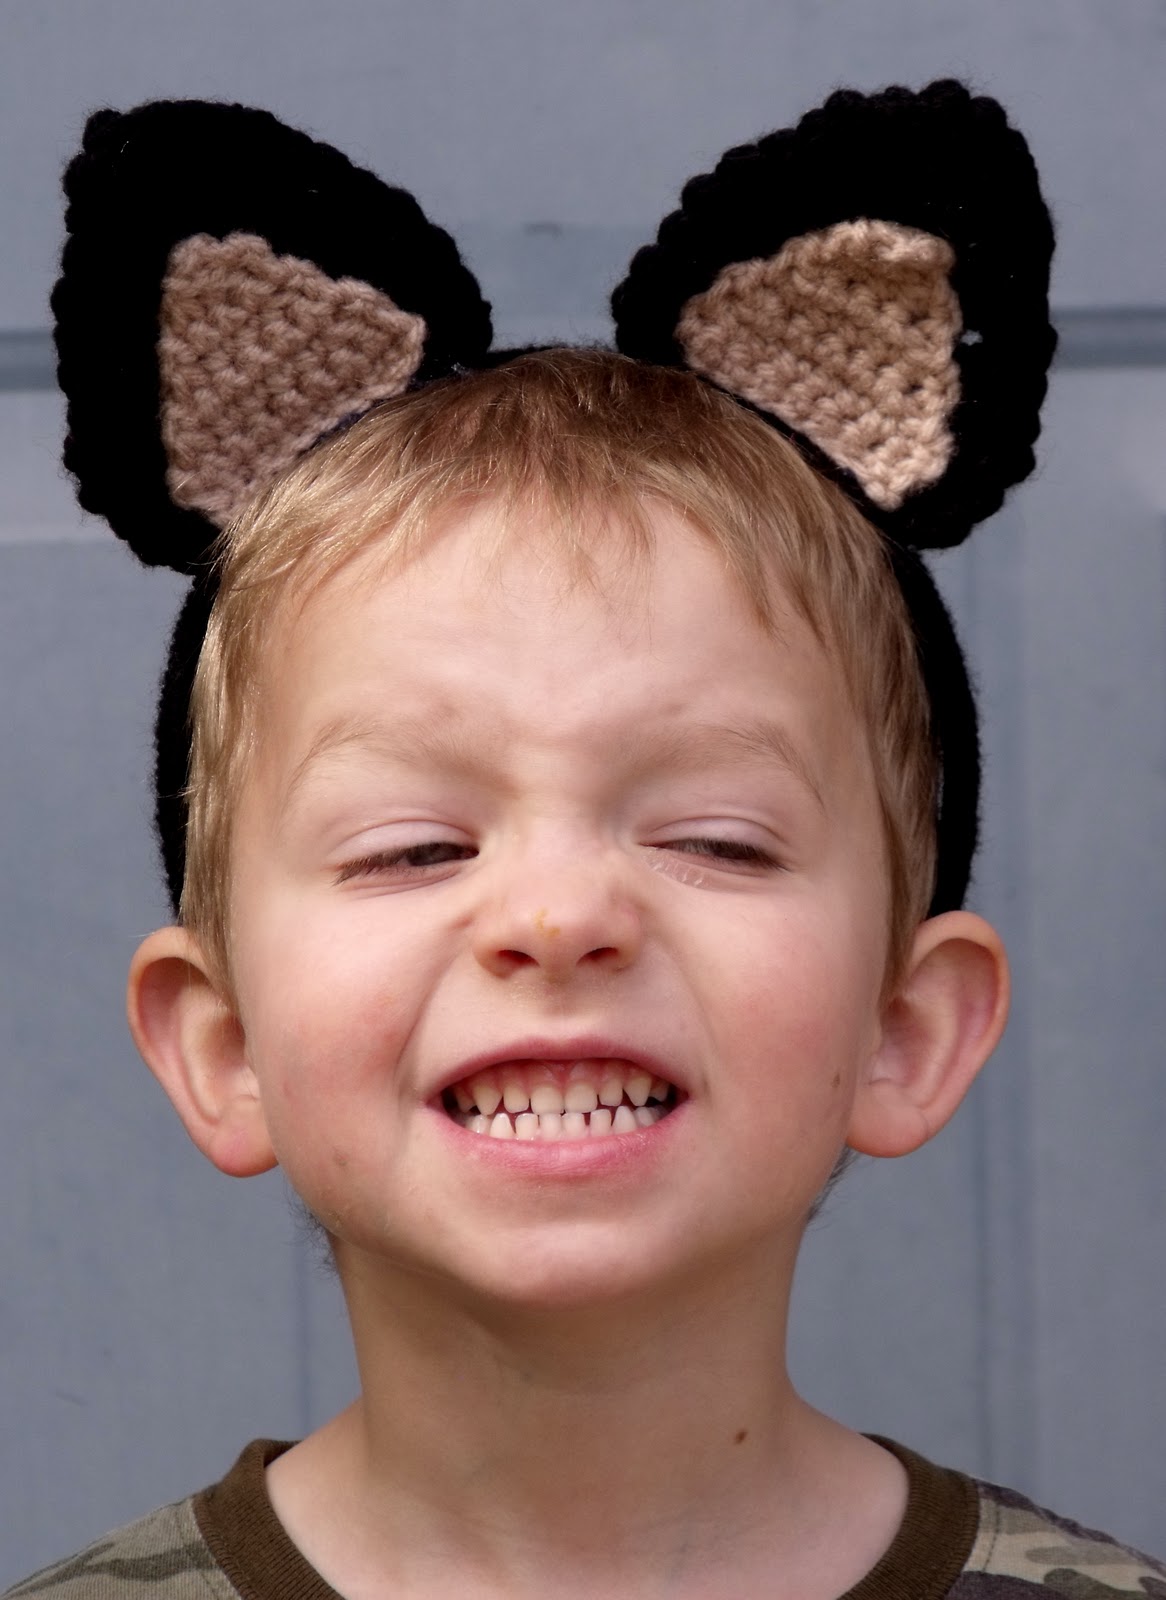
I wasn't really in the mood for sewing last night, but I knew I needed to work on the costumes, our Halloween party is on Saturday. So I grabbed yarn and hooks and came up with these cute little critter ears. The black ones are bat ears for Thomas, and the light brown ones are cat ears for Zaylee.

And I even wrote down the pattern for the ears so I can make them again and again, and so I can share it with you!


Critter Ears
Materials:
Thick, fuzzy yarn for outside of ear (I used Lion Brand Homespun), or you can use two strands of worsted weight held together
Worsted weight yarn for inside of ear
Size K (6.5 mm) crochet hook
Size H (5 mm) crochet hook
Headband
Glue gun

Special stitch - sc2tog. (Insert hook into next stitch, yo, draw up a loop) 2 times, yo, draw through all three loops on hook.

For large outer ear, use size K hook and thick yarn. For small inner ear, use H hook and worsted yarn. Both sizes use the same pattern.

Make 2 large and 2 small.
Ch 9.
Row 1 - Sc in 2nd ch and each across (8 sc)
Row 2 – Ch 1, sc in each across
Row 3 – Ch 1, sc2tog, sc in next 4, sc2tog
Row 4 – Ch 1, sc in each across (6 sc)
Row 5 – Ch 1, sc2tog, sc in next 2, sc2tog
Row 6 – Ch 1, sc in each across (4 sc)
Row 7 – Ch 1, sc2tog twice
Row 8 – Ch 1, sc2tog
Fasten off, weave in edges.

For the bat ears, I added a round of sc all the way around the outer ear. This is optional, it just smoothed out the edges of the ear. This was unnecessary on the cat ears because of the fuzziness of the yarn.

Use hot glue to attach small inner ear to large outer ear.

Wrap matching yarn around a headband, using hot glue to secure it periodically so it won't come unwound. Then glue the ears onto the headband.

Friday, October 21, 2011

Tiny Toddler Shrug

This started as an idea for a crocheted sweater dress for my toddler. But I realized partway through that it would be a little too long and a little too narrow to work as a dress. So I scrapped that idea. I turned the rectangle I had made on its side, sewed a couple little arm seams, and presto-chango, I had made a little shrug! I think it turned out so super cute.


I've even put together a pattern, my first crochet pattern. How awesome is that!

Tiny Toddler Shrug


Size: 24 month. Make a larger or smaller rectangle for other sizes.

Materials:
Small amount worsted weight yarn, colors A and B
Size I crochet hook

Special stitch:
5 dc cluster: (yo, insert hook into next st, yo, pull up a loop, yo, pull through first 2 loops) 5 times, yo, pull through all loops on hook.

With color A, ch 46.
Row 1: 2dc in 4th chain from hook (turning ch counts as first dc). *Sk 2 ch, sc in next ch, sk 2 ch, 5 dc in next ch.* Repeat to last 3 ch. Sk 2 ch, 3 dc in last ch. Drop color A. Do not turn.
Row 2: Join color B with sl st in top of turning ch at beginning of row 1. Ch 1, sc in same st, *ch 2, make 5dc cluster, ch 2, sc in 3rd dc of 5dc group.* Repeat to last 5dc group. Ch 2, sc in last dc of previous row, dropping color A and picking up color B. Turn.
Row 3: Ch 3 (counts as first dc), 2 dc in first st. *Sc in top of cluster, 5 dc in next sc.* Repeat to end, making 3 dc in last st. Drop color A. Do not turn.
Rows 4-38: Repeat rows 2 and 3.
Fasten off.

Make sleeves by folding the rectangle lengthwise, and sewing a seam 4 inches up each end, as shown. Turn right-side out, and put it on your little cutie!


Linking to friday fun finds at kojodesigns, and Feature Yourself Friday at Fingerprints on the Fridge.